Showing posts with label rings. Show all posts

07 September 2026

Krause, Bensons, Koloman Handler, Ring Alliance ring mechanisms?

If you have bought a non-Filofax branded organiser in the last few years what make of rings it is fitted with can be a bit of a puzzle. 

The ring mechanism as we know it now has been around since about 1915 in one form or another. The only major change has been the grouping of the rings so that they all open at once rather than the groups of 3 rings opening separately. See my earlier post on this. 

The ring mechanism wasn't just used for organisers, it was widely used and still is in a wide range of sizes and configurations, with varying number of rings used 2, 4, 5, 6, 7 etc. 

For something that has been in production so long it isn't surprising that there have been a few company name changes in over 100 years of production. 

Starting with Koloman Handler GmbH in Austria who started with 'book corners' They are credited in 1915 of the invention of the first ring mechanism.

By 1917 in Germany the company Walter Liebhold KG was founded, it was later to be renamed Robert Krause GmbH and Co KG, initially they made metal parts for drive belts and furniture locks. 

In 1922 Koloman Handler had established a production plant in Vienna to make ring binder mechanisms. 

In UK in 1923 Bensons was established by the Bennet Family and sons hence the name Bensons. 

In 1950 Walter Liebhold started production of ring binder mechanisms. 

The 1970's, 80's and 90's saw a lot of change in the ring mechanism makers. 

Bensons got sold to Esselte in 1976, they were an office supply company and are now part of the Acco group of companies. 

As volumes increased and production costs increased. Between 1985 and 1988 Koloman Handler outsourced its production to a facility in Hungary, whilst Bensons sent it's production to facilities in Singapore and Malaysia. They were to move production again to China in 1993 and then selling their production facilities by 1996.

1992 saw the establishment of the Hungarian subsidiary of Koloman Handler with automated production starting at the Hungarian plant in 1995. 

After 3 generations of family-ownership, Koloman Handler GmbH is sold to a financial group in 1998.

Moving in to the 2000's. Ring International Holdings AG (Austria) acquired Koloman Handler (GmbH) and it's Hungarian production facility and we see 'Ring Alliance' established as a trading name. 

Bensons joined the Ring Alliance in 2002 and now sells in the Netherlands, UK, France, USA and Singapore. 

All of Koloman Handlers production was moved to Hungary in 2003.

By 2016 Krause, Bensons, Koloman Handler are effectively all one company under Ring Alliance, owned by Ring International AG, who also own a variety of other companies producing a wide variety of products.

The 'Ring Alliance' product catalogue has all manner of ring mechanisms and stationery accessories in it for you to look at. The have all the different types of ring mechanisms (Pull open, Finger trigger, Lever arch, and others) 

Fascinating to discover how we got to where we are today! 

Even if your ring mechanism doesn't have one of the well known brand names on it, there is a strong possibility that it was made in Hungary or one of the overseas factories. Ring Alliance supply in units of 1000 mechanisms, and will engrave your company name on to the top plate for you. 


The Ring Alliance will only supply rings in units of 1000, obviously this is not very useful if you only need one or two sets to update an old Lefax or Filofax. 

However, Gillio and Van der Spek will sell individual ring mechanisms to individuals, you will find the details on their respective web sites:
Please note the naming conventions of both companies:
  • Filofax A5 = Gillio A5 = Van der Spek Manager A5
  • Filofax Personal = Gillio Medium = Van der Spek Standard
  • Filofax Pocket = Gillio Pocket = Van der Spek Junior
When comparing prices don't forget to factor in the cost of shipping and any taxes/duty if you are not in mainland EU. Gillio is located in Belgium whist Van der Spek are in The Netherlands. 

There are suppliers on ETSY, but considerable higher prices for Krause rings. 


19 February 2026

Guest post series - 'Filohax' No. 27 - Paul

Thanks very much again to Paul for this next instalment of his wonderful guest post series. 
You can find all of the 'Filohax' posts here.   
There is an index of all the previous Filohax posts here

Filofax Winchester Ostrich skin review 

After lusting over photographs of 'Buttercup' Ostrich skin Winchesters and being unable to justify the crazy prices being asked (and accepted) for them, I resigned myself to only ever viewing them from afar. Then out of the blue a black one popped up for sale on a website that rhymes with 'she may'! It had definitely been around the block a few times - but I like that in my vintage binders - it also made it within a sensible price range. I can't tell you the rigmarole I had to go through to purchase it, but eventually it arrived and for all of its rough and shabby edges I love it.


Except I didn't love the barely closing ring mechanism... I could use it, but you know that feeling when something isn't right? I had that feeling, which was harshing the good vibes I got every time I picked it up and felt the quills...


To the rescue came a Hamilton I had previously acquired for free. It was a perfectly good personal sized Hamilton - scruffy looking (which as I've said, I like), but I found it a little bit bulky and heavy, so I moved out and it had been storing inserts for a while.

However, the Hamilton's rings were perfect, so I decided to swap them into the Ostrich as this was going to become my daily work binder. One thing I did notice whilst handling these two binders was the difference in weight - the Ostrich skin is noticeably lighter, and as I carry my Filofax a lot at work this would make a big difference. 


So, with some trepidation I got Steve's YouTube video on changing rings on (even though I've changed rings on Winchesters a few times now) and swapped them over. I love 'de-skuzzing' the leather once the back plate is out - we're talking 30+ years of gunk!


I'm over the solar system with the results - the Ostrich skin has been my work companion for over three months now. This binder, although once an 'exotic' is my workhorse (I should say 'Work-bird!') like my other work binders before it over the last three years:

  • My original Winchester 23mm I bought in 1989 
  • Cavendish 30mm 
  • Winchester Cognac 23mm 
  • Gloucester 23mm 
  • Albany 23mm 
  • Gloucester 23mm 
  • Portland 30mm 
  • Argyle 23mm 
  • Winchester Croc 23mm 
  • Hamilton 23mm 
  • Winchester Ostrich.

There's something rugged yet light about the Ostrich (paradoxically the world's heaviest bird!) - the black colour masks the rich texture of the quills - until you feel it. But it's the lightest weighted Winchester I've held.

A few months in and the wear that was visible (top and bottom where the metal clips of the ring mechanism touch the leather) - has advanced so that the metal is starting to show through, and it won't be long until slivers of ostrich skin will be shearing off...I can't wait! I know, to collectors this must sound maddening, but the value to me is in the use, and the visible effects of a job well done. 


 I'll post again in a few months with updated photos of the wear and tear.         

04 December 2025

Using a Filofax with a disability.

I get some interesting questions in our email in-box. This was one such email from a reader. 

They love using a Filofax organiser, but due to a slight disability in their hands they find the tabs very hard to operate to open the rings. 

We all know that you shouldn't tug the rings open with your fingers, this can lead to ring gaps on one pair of rings or more, so it isn't really an alternative method to using the tabs. 

If you look in detail the tabs as they are pushed down, push up on the two ring halves to open them. Sort of a 'see-saw' action. Simple but effective, but there's no way to make it easier to push down, unless you welded a longer piece of metal on to the tabs to increase the leverage, but then the tabs would stick out of the Filofax, so not really desirable. 

Looking at the Filofax 'Clipbook' The ring mechanism used doesn't have tabs. To open the rings you pull the covers apart. This works because the rings loop through the cover and as you pull the covers apart with the Clipbook open it applies an even pressure on each ring halve to open it. 

My first suggestion was to adapt this idea for normal Filofax organisers using plastic dividers punched and inserted in to the pages and then pull them apart to open the rings. But you would be griping a fairly thin bit of plastic and you would have to grip it quite tightly for it to work. 

Next, I suggested looping cords around the rings so again you could pull them apart easily. This might work, but there might still be a risk of the top and bottom ring pairs being strained. 


If you pulled from the central part of the loop as well as the part that emerges from the top and bottom of the rings then that would even out the pressure a bit. (I've not tried this yet!) 

Do any of you have any better ideas on how to solve this problem. Please comment below if you do. 

Thank you. 

[Update] This is a suggested solution put forward by Hans, thank you: 


[Update 2]

Thank you to Kevin B for this image of the mechanism he mentions in the comments. Instead of pushing down on the tabs it's more of an outward action because the tabs are nearly vertical, similar to those found on some Franklin Covey organisers. 


27 March 2025

Can I Fit Bigger or Smaller Rings?

'Can I fit bigger rings to my Make X Model Y in Size Z?' Is a question I am often asked.

People start the year and as the year progresses so the amount of paper they are carrying increases etc. I'm sure you know the story well.

The answer is 'Yes' and 'No' !

Why you might ask... well let's look at the mechanics of rings.

Rings are available in a variety of sizes and often in gold and silver. In the past they were painted/powder coated a few different colours as well.

Image Source - Van der Spek

The different sizes of organiser and different ring sizes result in different dimensions for the mounting points of the rings on to the base plate. As you can see below Standard (Personal) uses the same base plates for both 25 and 30mm rings. Likewise Senior (A6) uses the same for 20 and 25mm as well as the Gillio 23mm A6 rings.

Sadly, on Junior (Pocket) size they have different mounting point dimensions for the 16 and 20mm rings. Therefore you can't easily upgrade a pocket from 16mm to 20mm rings. You would have to do some surgery to remove the backplate and replace it with the correct one. Not impossible, but you would need to be reasonably skilled to do this sort of work, to re-stitch the exterior and interior leather back together again.


As you can see some conversions are reasonably easy to do 25mm -> 30mm on Standard (Personal/Medium) size are more or less a straight swap.

However, this is where an element of 'No' you can't swap the rings comes in.

Whilst they will physically fit the back plate and work etc, there might be an issue with the space left for the pages, increasing the ring size by 5mm in the above example, means that the thickness of the organiser might be increased by 5mm and the edge pages are moved 5mm closer to the outer edge of the organiser.

That said in some cases the designer obviously considered the larger ring size and the cover is 'bigger'  than the normal size of rings and therefore some can take the larger rings without the pages/tabs sticking out beyond the edge of the organiser.

Is there a list of ones that can take bigger rings? Not as such, but a simple way of telling is to measure the distance from the middle of your paper stack in the organiser to the edge of the organiser when closed. The middle being the highest part of the curve of the rings and is therefore closer to the edge.

Also be aware of the top or the bottom of your stack of pages getting closer to the pen loop if there is one.

Another way of creating the additional space to allow for the increase in ring size is to go from using side tabs to top/bottom tabs.

Going down in ring size say from 30mm to 25mm isn't a problem as long as the ring mounting points are the same, you just need to exchange the rings over. And if you are careful removing the rings you can reverse the change easily should you want to go back to the original size.

I hope that helps and answers your questions, if not please leave a comment below and I will try to respond to your questions as quickly as possible.


27 January 2025

Looking after your personal organiser


Now is as good a time as any to give your organiser a little T.L.C. I tend to do this at least once a year or when I'm swapping from one organiser to another one for a bit of variety. 

Step 1. - Remove all of the inserts and dividers and contents of the pockets. Put them to one side for now. 

Step 2. - Inspect the rings, checking for gaps. Open and close them a few times. Give them a light polish with a micro-fibre cloth, this will remove any dirt and grime and make them look like new again. 

Step 3. - Use a  small soft bristle paint brush to dust the interior of the organiser. The brush will reach in to all the nooks and crannies and remove any build up of paper dust that seems to come off of cut/punched paper. 

Step 4. - If the organiser is leather, consider giving it some leather cleaner/balm treatment. Use it sparingly though, don't use too much. Again use a micro-fibre cloth to buff the finish to a pleasant shine. Always read the instructions first. 

For simulated leather organisers give them a wipe with alcohol-free baby wipes. The cloth sections on the interior can be gently cleaned with small amount of fabric or upholstery cleaner. Test any products first on an inconspicuous area. 

Leave it open to breath after the treatment. 

Step 5. Turning to the inserts. Go through them and see if there are any pages that need archiving or updating. Check the paperwork and accessories you have been carrying too. 

Check that the pens aren't about to run out of ink, also check them for internal leaks too. 

Links:

Enjoy the process. 

24 April 2023

Krause, Bensons, Koloman Handler, Ring Alliance ring mechanisms?

If you have bought a non-Filofax branded organiser in the last few years what make of rings it is fitted with can be a bit of a puzzle. 

The ring mechanism as we know it now has been around since about 1915 in one form or another. The only major change has been the grouping of the rings so that they all open at once rather than the groups of 3 rings opening separately. See my earlier post on this. 

The ring mechanism wasn't just used for organisers, it was widely used and still is in a wide range of sizes and configurations, with varying number of rings used 2, 4, 5, 6, 7 etc. 

For something that has been in production so long it isn't surprising that there have been a few company name changes in over 100 years of production. 

Starting with Koloman Handler GmbH in Austria who started with 'book corners' They are credited in 1915 of the invention of the first ring mechanism.

By 1917 in Germany the company Walter Liebhold KG was founded, it was later to be renamed Robert Krause GmbH and Co KG, initially they made metal parts for drive belts and furniture locks. 

In 1922 Koloman Handler had established a production plant in Vienna to make ring binder mechanisms. 

In UK in 1923 Bensons was established by the Bennet Family and sons hence the name Bensons. 

In 1950 Walter Liebhold started production of ring binder mechanisms. 

The 1970's, 80's and 90's saw a lot of change in the ring mechanism makers. 

Bensons got sold to Esselte in 1976, they were an office supply company and are now part of the Acco group of companies. 

As volumes increased and production costs increased. Between 1985 and 1988 Koloman Handler outsourced its production to a facility in Hungary, whilst Bensons sent it's production to facilities in Singapore and Malaysia. They were to move production again to China in 1993 and then selling their production facilities by 1996.

1992 saw the establishment of the Hungarian subsidiary of Koloman Handler with automated production starting at the Hungarian plant in 1995. 

After 3 generations of family-ownership, Koloman Handler GmbH is sold to a financial group in 1998.

Moving in to the 2000's. Ring International Holdings AG (Austria) acquired Koloman Handler (GmbH) and it's Hungarian production facility and we see 'Ring Alliance' established as a trading name. 

Bensons joined the Ring Alliance in 2002 and now sells in the Netherlands, UK, France, USA and Singapore. 

All of Koloman Handlers production was moved to Hungary in 2003.

By 2016 Krause, Bensons, Koloman Handler are effectively all one company under Ring Alliance, owned by Ring International AG, who also own a variety of other companies producing a wide variety of products.

The 'Ring Alliance' product catalogue has all manner of ring mechanisms and stationery accessories in it for you to look at. The have all the different types of ring mechanisms (Pull open, Finger trigger, Lever arch, and others) 

Fascinating to discover how we got to where we are today! 

Even if your ring mechanism doesn't have one of the well known brand names on it, there is a strong possibility that it was made in Hungary or one of the overseas factories. Ring Alliance supply in units of 1000 mechanisms, and will engrave your company name on to the top plate for you. 


13 February 2023

Which Filofax Organisers Have Krause Style Rings?

Which Filofax organisers are fitted with Krause style rings? Ones that can removed and replaced? 

This question came up recently. I'm not aware of a listing of which models have Krause style rings. Therefore I think we should create one. 

I will add a further qualification to the question though, whilst some of the recent models such as the Classic Croc have non-riveted ring mechanisms they instead use the PXR style mechanism which are very securely mounted on the backing plate. This makes them difficult to remove and also to replace them because finding replacements is not easy, unless you know different. 

To create this list we need your help. Please comment below with the name of the model and the approximate year and include if the ring mechanism is riveted in or it has a plain top cover which would suggest a Krause style mechanism is used. 

To get us started here are some popular models:

  • Malden - Riveted
  • Finsbury - Riveted
  • Winchester - Krause Style
  • Chameleon - Riveted
  • Domino - Riveted through the spine
  • Fusion - Riveted
  • Belmont - Krause Style
  • Holborn - Riveted
  • Sandhurst - Krause Style
  • Cavendish - Krause Style
  • Kensington - Krause Style
  • Eton - Krause Style
  • Cuban - Riveted
  • York - Krause Style
Thank you for your help. 

22 December 2022

Removing/Replacing Rings

Removing rings from your Filofax to then use it as a notebook cover seems to be very in vogue at the moment. The reasons for doing so are mixed and you will have your own ideas as to why this is a good idea or not. 

Removing rings using some methods is not a reversible process, if a month or so later you decide that a bound planner isn't for you and you want to go back using rings then you might have to buy a new organiser because the rings you removed are no longer fit to be reused. 

In the case of riveted in rings on say a Filofax Malden, the only way to remove them is to drill out the rivets. The only way to reinsert the rings is to then look for a set that bolt in and you will have to have the blind domed headed bolts on the outside of the spine. Not terrible but certainly not acceptable to some people. 

Krause rings or a similar design of removable rings were not designed originally with the idea of them being put in and taken out of the organiser on a frequent basis. The design originates from over a hundred years ago! 

Alternative designs do exist of course, the rings used in Moterm and Franklin Planners are held in with a small screw fastener, making them much easier to change. 

Unfortunately there are videos on You Tube on how to remove rings that in my opinion, use methods that are fairly destructive and result in the mechanisms being damaged to the point you wouldn't be able to reuse them. That's fine if you never want to use the rings again, or they were damaged beyond repair anyway and you have a new set to go in. 

Before we get too far in to explaining why I don't recommend some methods and how to do it with the minimum of risk in damaging the rings or the organiser, let us recap on the names of the parts of the ring mechanism. 

A picture saves a thousand words! 


The cover plate is not only there for decorative purposes, it actually holds the tabs in when the rings are open. It is only made of thin metal and it is easily damaged. If you bend it too much it will end up with creases in it. 

When pulling the rings apart to remove them, once the cover is off, try to pull evenly with rings 3 and 4, this spreads the load. I've seen some people only pull one pair of rings apart and that might result in the mechanism becoming twisted and therefore having gaps if you try to reassemble them. 

Another flawed method is to prise the rings off the mounting lugs, this can not only damage the leather but it will bend or even break the mounting lugs if extreme force is used. Please don't do it! 

Videos with methods I don't recommend or support:
After seeing that last one from 9 years ago. I devise my own more mechanically sympathetic methods which you will see used in these two videos:
If looked after and not abused a set of rings should last a lifetime. 

If you have any problems with replacing rings just get in touch with me steve at philofaxy dot com and we can arrange to connect to solve the issues.  

28 July 2022

Organiser Maintenance Tips


Now is as good a time as any to give your organiser a little T.L.C. I tend to do this at least once a year or when I'm swapping from one organiser to another one for a bit of variety. 

Step 1. - Remove all of the inserts and dividers and contents of the pockets. Put them to one side for now. 

Step 2. - Inspect the rings, checking for gaps. Open and close them a few times. Give them a light polish with a micro-fibre cloth, this will remove any dirt and grime and make them look like new again. 

Step 3. - Use a  small soft bristle paint brush to dust the interior of the organiser. The brush will reach in to all the nooks and crannies and remove any build up of paper dust that seems to come off of cut/punched paper. 

Step 4. - If the organiser is leather, consider giving it some leather cleaner/balm treatment. Use it sparingly though, don't use too much. Again use a micro-fibre cloth to buff the finish to a pleasant shine. Always read the instructions first. 

For simulated leather organisers give them a wipe with alcohol-free baby wipes. The cloth sections on the interior can be gently cleaned with small amount of fabric or upholstery cleaner. Test any products first on an inconspicuous area. 

Leave it open to breath after the treatment. 

Step 5. Turning to the inserts. Go through them and see if there are any pages that need archiving or updating. Check the paperwork and accessories you have been carrying too. 

Check that the pens aren't about to run out of ink, also check them for internal leaks too. 

Links:

Enjoy the process. 

21 February 2022

Krause and Moterm Rings

This is an update of a post I did about 5 years ago, a few things have changed in that time, these changes are reflected in this post. 


Krause rings are considered to be the best available. I use them in all my 'expensive' organisers 

When they haven't come fitted with Krause rings I've fitted them myself. It is a relatively easy job to do. With the right tools and the skills it only takes a few minutes to swap out the old rings and install the new ones.

I did this video a while ago which shows the essential things you need to know about changing rings.


I have also done a more recent video, which builds on the experience of changing lots of these rings. 


Until recently obtaining Krause rings wasn't a simple task... all that has changed though.

Van der Spek have now made the Krause rings available to order on their web shop.  All Van der Spek organisers come fitted with Krause rings including their excellent 'Touch Me' range.  You will find Krause rings in the Accessories section of the Van der Spek website here


Petra has supplied this useful photo of the rear side of each mechanism so you can compare them to the ones you already have to make sure they will fit your organiser. 


Points worth noting as follows:
  • Junior is the same as Filofax Pocket and Gillio Pocket (same spacing as well). 
  • Please note that the 20/25mm pocket rings are not interchangeable with the 16 mm pocket rings, the mounting points are a different distance apart. Therefore to use the 20 or 25mm rings the internal mounting plate would need to be changed as well. 
  • Senior is the same as Mulberry Agenda and used for A6 organisers including the Gillio A6.
  • Standard is the same as Filofax Personal and Gillio Medium
  • A5 is the same as Filofax/Gillio A5, but note the three mounting points with the latch in the middle. Older A5's had only 2 mounting points not three as in this current design. 
Gold rings are available at extra cost because they are gold plated to order or they get them done in small batches. 

Thank you to Petra Van der Spek for the photographs and for making the rings available on their web site.

For details of the full range of Van der Spek products see their site.

If your organiser isn't fitted with this type of ring mechanism, there are some alternatives available. 

If you have a ring mechanism that is riveted on the following type might be a suitable bolt on replacement. 

I have bought some Moterm Ring Mechs via AliExpress, they are acceptable quality and the cost including shipping is very reasonable. 

You will need to check the spacing of the securing rivets compared to the Moterm bolting points. They are very easy to fit once you have removed the old rings. 

You will find the details here: AliExpress Moterm

If you do have to make new holes to fit the Moterm rings, you could fill the old holes with a similar type of domed nut and bolt arrangement, similar to the ones that Moterm supply to fit their rings. See the picture below. 


Moterm rings with their fixings, very easy to attach. 


What ever sort of ring mechanism you have, if you have any questions about them and this post hasn't answered your questions. Drop a comment down below or email me steve at philofaxy dot com and I will do my best to help you out. 

17 June 2021

Opening and Closing Your Organiser Rings Correctly.

Are all opening and closing the rings correctly? I'm sure some of us have been watching You Tube videos and seen people pull the rings open with their fingers! 

To ensure that you don't damage the ring mechanism on your Filofax personal organiser, always use the tabs at the ends of the ring mechanism to open the rings. Place your organiser on a firm surface and press evenly on both tabs at the same time.

Do not under any circumstances pull the rings open using the rings themselves; this could result in the internal mechanism becoming damaged.

Opening the rings


Closing the rings

To close the rings use your fingers on either sides of both sets of rings with a light even pressure and the rings should snap shut. Be careful to not trap your fingers in the closing rings.


The mechanism does not require any routine maintenance or oiling, just an occasional wipe with a soft dry cloth will keep the metal clean and rust free.


15 March 2021

Ring Mechanism Tabs

The tabs on the ring mechanism are those parts at the each end of the mechanism that you push down on to open the rings. 

Here is a ring mechanism with the top cover removed to show the inner details of the mechanism. The top cover actually holds the tabs in place as well as making the mechanism look more attractive to look at! Without the top cover in place the tabs might fall out when the rings are open. 


If we zoom in now on one of the tabs. The two lugs on each of the tabs go through the rectangular holes in the ring base plates (The plates that the rings are attached to). In the closed position you will notice little or no movement in the tabs. 


When you push down on the tabs, this results in a small upward movement at the opposite end of the tab. That upward movement pushes the ring plates up and the rings open. In the open position you should find that the tabs are quite loose. 


Here are the tabs themselves. The two outer lugs are the ones you see in the photos above and the larger central lug is the bit that pushes upwards when you press down on the tabs to open the rings. 


You can't close the rings by using the tabs, only open them. However, sometimes when you close the rings with your fingers a tab can get partially stuck and that can then hold the rings slightly open, causing gaps in the rings. 

If you see this, lift the two tabs upwards to see if that solves the problem. In addition check that the top cover hasn't moved, as that can impede the movement of the tabs or the rings themselves. 

A simple check is to open and close the rings a few times and see if that frees things up a bit. 

I have been asked in the past if the ring mechanism needs any lubrication. The only thing this will do will be to prevent parts from rusting, generally the parts aren't under any stress and the movement is so small that lubrication will not normally be necessary. However, a small 'squirt' of WD40 or similar will not do any harm, just don't over do it and make sure you wipe off any excess with a paper towel otherwise it might stain the leather/fabric covering of the organiser. 

On ring mechanisms that can be taken apart like the ones above, I usually apply a small amount of vaseline to assist in reassembling the rings, but again I'm careful to wipe off any excess before reattaching the ring mechanism to organiser back plate. 

As always if you have any problems with ring mechanisms that you haven't been able to solve yourself please feel free to contact me. 

28 January 2021

The Philofaxy Guide to Caring for your Organiser

This is the first of a new series of Philofaxy Guides. We hope to cover a variety of other organiser related topics in the future months. We will also revisit these topics and republish updated versions over time too. We will include links to our own previous posts as well as external sites that we think are relevant to the topic. 

Anita and I thought we would start off with 'Caring for your organiser' as it is such a frequent topic with questions coming up on social media every week that we both get to respond to. 

Cared for, your organiser can potentially last for many decades and still provide excellent service many years after you purchased it. 

Let us break down your organiser and look at the various parts that need a little TLC from time to time. 


The Cover

The cover of your organiser is one of the parts that has to battle against the elements the most to protect your pages from being damaged. 

The cover can be made from a variety of materials or combinations of materials. 

Leather is a popular choice because of it's resistance to wear and tear, but over time it can become a little 'battle scarred if it is put in and out of a bag along with a lot of other 'stuff'. 

Plastic outer covers might not be the nicest to hold in your hand, but they can be a bit more carefree, only needing a little wipe with a damp cloth every once in a while to remove any dirt and grime through everyday use. 

I've also used ordinary household silicon based polish on this sort of cover. 

Cloth covered outer covers are nicer to hold, not related to an animal, which is important to some people, but like your clothes they can look a little tired after a few years of constant use. There have been 'Denim' Filofax organisers over the years, a potentially hard wearing outer cover. 

For these I recommend the foam type 'dry' cleaning sprays used for household textiles. You don't want to get this type of cover 'wet' because it might stain as it drys and also the interior between the outer and inner layers could be damaged. A little gentle brush with a soft brush can free the dirt and restore the cover to being 'like new' again. Follow the instructions on which ever product you use. 

One golden rule before you use any cleaning solution on any cover is to test it first. Either on a part of the organiser that will not be seen such as the inside of the clasp. Or if you have a leather sample for your particular organiser. Test the cleaning or stain removal on the leather sample first. The sample can be cheaply replaced, your custom organiser less so. 

The Rings

In normal every day use your rings shouldn't get damaged or become misaligned or start to have gaps. But it does happen. 

The first rule of course is to always use the tabs to open the rings, pushing down on the tabs at both ends together. And closing the rings by gently squeezing them together, being careful to not trap your fingers...ouch!

In the case of buying a pre-owned organiser you might inherit someone else's poor treatment of the rings or you might find a long lost organiser that hasn't been stored in dry conditions. 

The rings are typically made of polished/chromed steel so they can go rusty, generally only surface rust. You can rescue them with some metal polish and a dry cloth and a lot of hard rubbing! In extreme cases you might need to use some steel wool to get rid of the worse of the rust before using metal polish. 

The internal workings of the ring mechanism is also prone to rusting, but you might not be able to access them, a short squirt of WD40 using the nozzle inserted between the tabs and the cover this will help prevent any further rust, but be careful to not over do it and wipe away any excess with some paper towel or similar. 

If you need to change the rings then it will depend on the type of rings fitted to your organiser. Some are 'relatively' easy to change, others not so easy if they are riveted to the cover. 

We have a collection of posts and videos on 'adjusting' and replacing rings:

Here is my recent video for changing and reassembling Krause rings often found in Van der Spek and Gillio organisers. 


If you get stuck with any ring problems please contact steve at philofaxy dot com

If you have any feedback on this guide, please leave a comment below. Likewise if you have any suggestions for future Philofaxy Guides, please leave a comment below, thank you.

02 November 2020

Van der Spek Offering New Ring Sizes

Van der Spek are now offering 25mm rings in addition to 20mm rings in their Junior (pocket) size organisers. You can order 25mm rings in both Custom and Touch Me ranges via the website. 

In addition they have also announced 30mm rings for the Senior (A6) size this is in addition to 25mm and 20mm rings in this size for both Custom and Touch Me ranges. 

See the photo below to see what sizes are inter-changeable on the same mountings. 


See the Van der Spek website for full details. 

Thank you to Petra Van der Spek for supplying the information for this post. 

09 January 2020

Time to put your Organiser on a diet?

With Christmas out of the way,  I see that a few of you are doing Weight Watchers and other healthy and diet type things.

January arrives... new diary... new goals and all that stuff and 'Oh I must go on a diet' 'I can't get in any of my clothes' ..... where did I put my waist band extender...?

What else do you do at New Year.....???

You suddenly grab those nice new 2020 diary inserts that you have had since August. Click open your Filofax rings.... using both the tabs of course and then you slot in the whole 12 months in one go.

You try and close the rings... using both hands and then there is a problem... your Filofax has now 'bulked up' like a Michelin Man....


Time to put your Filofax on a diet too.... here are some tips...
  1. Don't put in all of your diary insert, only put in as much as you need.. 3, 4, 6 months at a time. 
  2. Supplement your diary insert with a Year Planner for the more distant events and appointments. 
  3. Archive previous months as they pass.
  4. Don't carry lots and lots of spare pages, only enough for the time you will be away from your stash of inserts and goodies.
  5. How many sheets of stickers and sticky notes do you really need to carry? 
  6. Do you really need to carry maps and tube maps when you have no intention of going on the tube for several weeks?
  7. Do an annual or bi-annual review of all the pages you are carrying, check the names and addresses pages too. 
You have done all of that But how much is too much in a Filofax? 

If you open your Filofax with all the pages to one side and you can just see the join in the rings, then you are most probably ok.

Any more than that and you will start to have problems turning pages. If you are seeing the inside edge of the paper getting folded and creased that is another sign that you have too much paper in your Filofax.

If you are using Personal size, then remember you have quite a range of ring sizes from 11 mm to 30 mm to choose from for however many pages you want to carry.

Mr Malden above has been relieved of all those excess pounds... sorry pages after the photo was taken!


18 March 2019

Can I Fit Bigger or Smaller Rings?


'Can I fit bigger rings to my Make X Model Y in Size Z?' Is a question I am often asked.

People start the year and as the year progresses so the amount of paper they are carrying increases etc. I'm sure you know the story well.

The answer is 'Yes' and 'No' !

Why you might ask... well let's look at the mechanics of rings.

Rings are available in a variety of sizes and often in gold and silver. In the past they were painted/powder coated a few different colours as well.

Image Source - Van der Spek
The different sizes of organiser and different ring sizes result in different dimensions for the mounting points of the rings on to the base plate. As you can see below Standard (Personal) uses the same base plates for both 25 and 30mm rings. Likewise Senior (A6) uses the same for 20 and 25mm as well as the Gillio 23mm A6 rings.
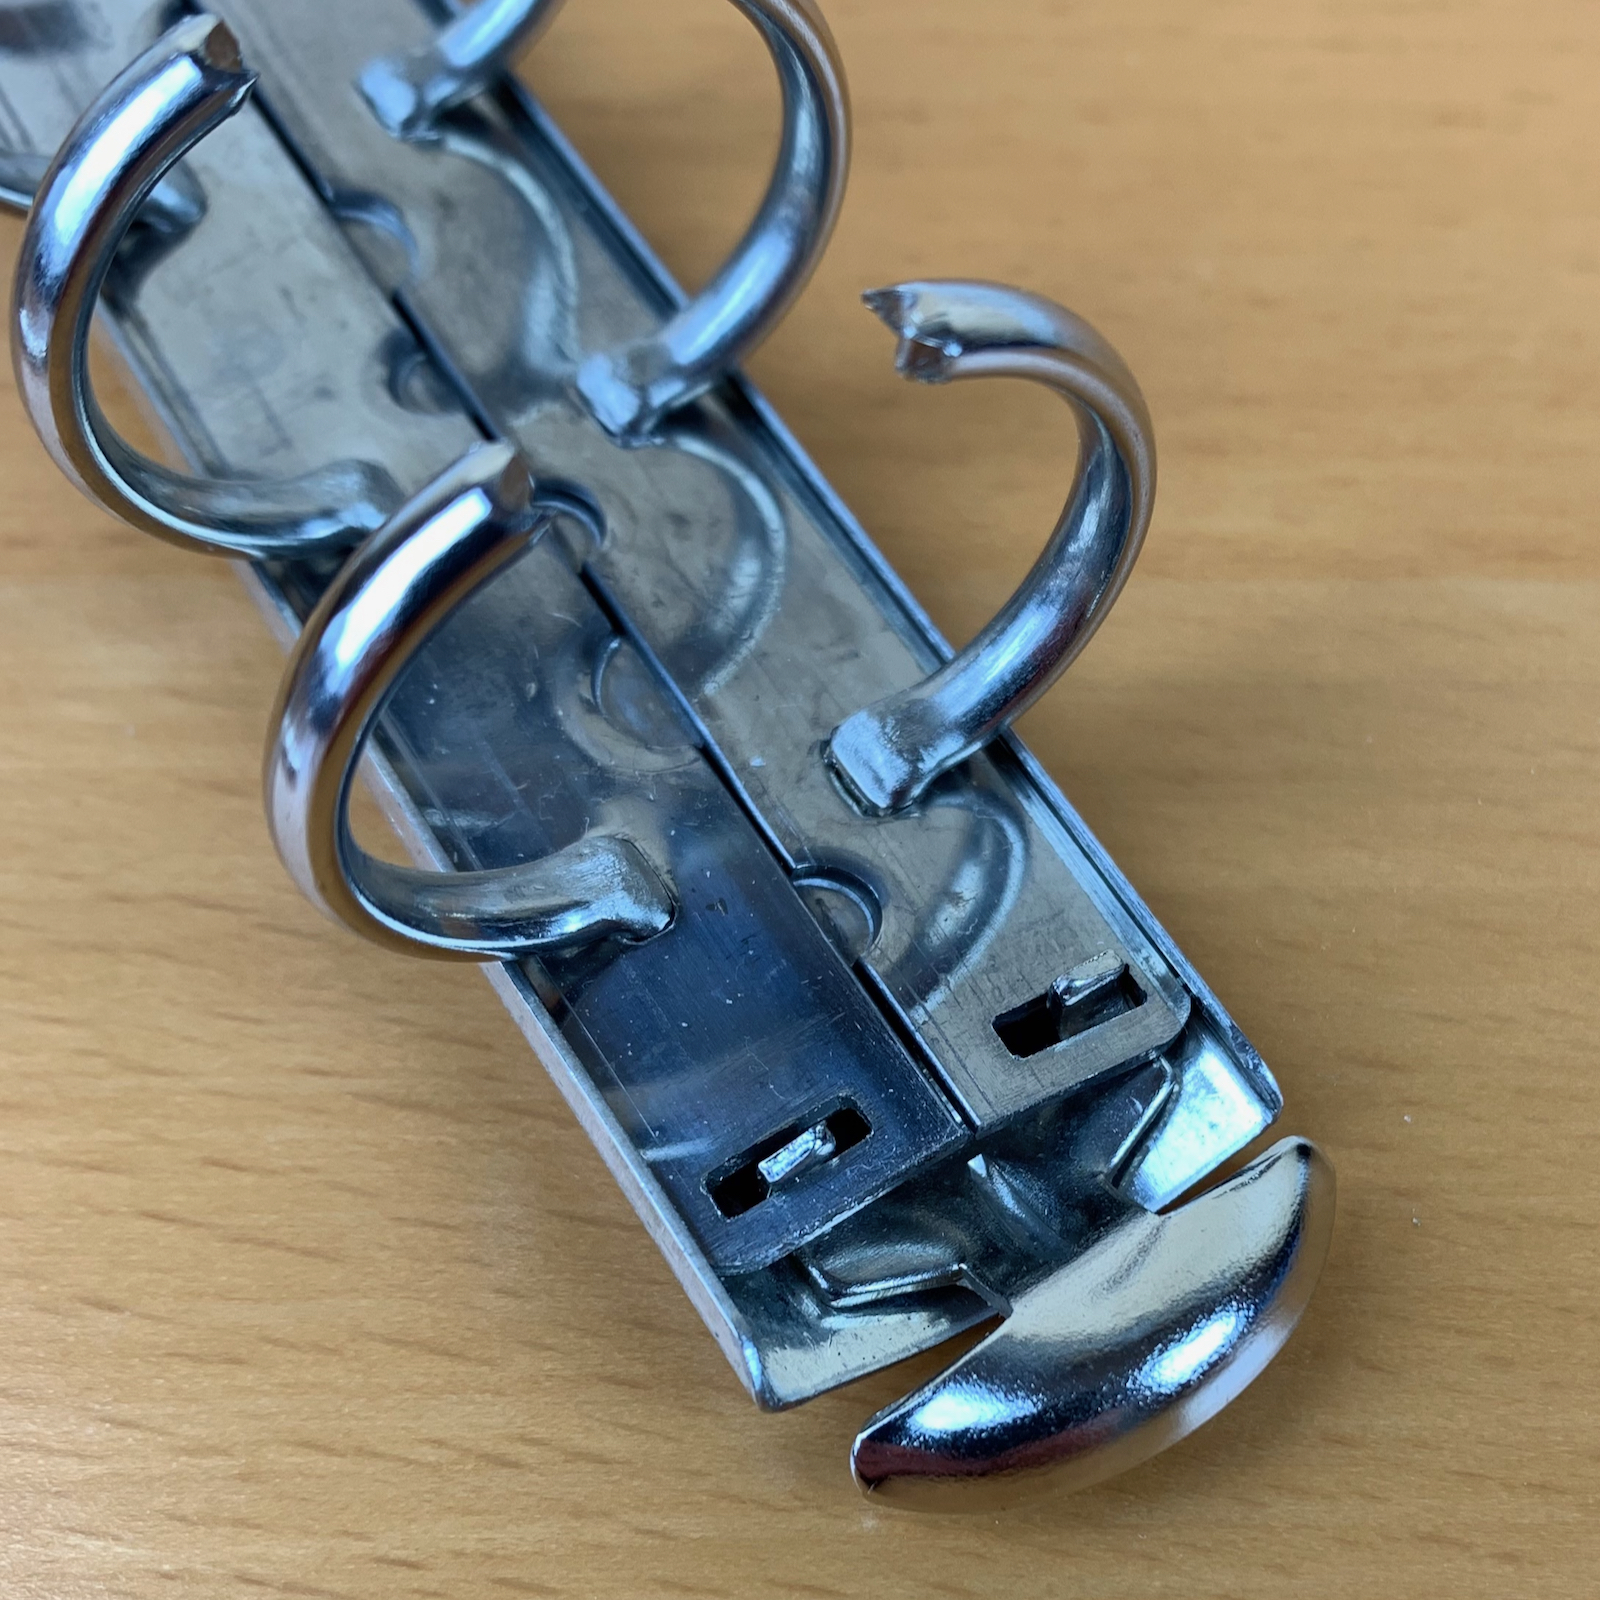
Sadly, on Junior (Pocket) size they have different mounting point dimensions for the 16 and 20mm rings. Therefore you can't easily upgrade a pocket from 16mm to 20mm rings. You would have to do some surgery to remove the backplate and replace it with the correct one. Not impossible, but you would need to be reasonably skilled to do this sort of work, to re-stitch the exterior and interior leather back together again.


As you can see some conversions are reasonably easy to do 25mm -> 30mm on Standard (Personal/Medium) size are more or less a straight swap.

However, this is where an element of 'No' you can't swap the rings comes in.

Whilst they will physically fit the back plate and work etc, there might be an issue with the space left for the pages, increasing the ring size by 5mm in the above example, means that the thickness of the organiser might be increased by 5mm and the edge pages are moved 5mm closer to the outer edge of the organiser.

That said in some cases the designer obviously considered the larger ring size and the cover is 'bigger'  than the normal size of rings and therefore some can take the larger rings without the pages/tabs sticking out beyond the edge of the organiser.

Is there a list of ones that can take bigger rings? Not as such, but a simple way of telling is to measure the distance from the middle of your paper stack in the organiser to the edge of the organiser when closed. The middle being the highest part of the curve of the rings and is therefore closer to the edge.

Also be aware of the top or the bottom of your stack of pages getting closer to the pen loop if there is one.

Another way of creating the additional space to allow for the increase in ring size is to go from using side tabs to top/bottom tabs.

Going down in ring size say from 30mm to 25mm isn't a problem as long as the ring mounting points are the same, you just need to exchange the rings over. And if you are careful removing the rings you can reverse the change easily should you want to go back to the original size.

I hope that helps and answers your questions, if not please leave a comment below and I will try to respond to your questions as quickly as possible.


24 September 2018

Maintaining Your Organiser(s)

Caring for your organiser or organisers if you have few isn't something you need to do that often.

However, it doesn't harm to put a reminder in your diary to go through your collection once a year and check them over and give them a clean and inspection.

I'm about to do my annual check of my 'collection', which will involve emptying each shelf of my cupboard. Then go through each box in turn and carry out the following actions.
  1. Empty the contents out of the pockets and remove anything from the rings. Although I tend to store most of mine empty. 
  2. Visually inspect the exterior and interior and note any loose stitching and any damage. 
  3. Check the rings for any gaps or mis-alignment. 
  4. Open and close the rings a few times using the tabs of course and then recheck the rings. 
  5. Dust the interior and wipe the exterior with a clean microfibre cloth. 
  6. Treat with leather balm if required.
For the visual checks you only need the Mark 1 Eye Ball! Or a magnifier, if like me you can hardly focus close these days!

If you spot any loose stitching a little spot of clear nail varnish or glue, the smallest spot possible will stop it getting any worse.

When checking the rings also use your fingers to feel for any rough transitions as these will catch on the paper as you turn the pages. Refer to our guide on fixing ring problems if required.

To dust the interior you can use my sticky tape trick to remove any paper dust from the textile interior or the raw leather backing. Here is a video on this technique.

If you need to treat the leather use a recognised leather care product, I use the products shown below, but other brands are just as acceptable, see what is available locally to you. Check the type of leather you have first.

Apply with a soft clean micro fibre cloth and use soft circular motions to get the balm in to the pours of the leather.

Beware not all leathers need or accept leather treatments, check with the manufacturer or test on a small not visible area first.

There is an excellent page on leather care here.


Of course when you have finished pop your pages back in again and you are ready to go for another year or so.