

Zoe is a Filofax lover from Australia (pink Domino A5). Her blog, Zoe at Home, is about simplifying, downsizing and small-space living. And of course, organising your life with the help of a great planner!
We all know a picture is worth a thousand words, right? Well, there’s no need to learn Photoshop or buy an expensive camera to make great pictures of your Filofax for your blog. In fact, even with just a smart phone, some free software and a few simple tricks, you can develop a style of photography that really tells the story of how using your Filofax enhances your life and bring new visitors to your blog at the same time.
1. Get the best light. The easiest thing you can do to improve your pictures is to shoot in great lighting conditions. Natural light is the best, so try to shoot in the middle of the day, near a window or outside. Shooting against a white backdrop will amplify the available light. If you’re shooting inside, you might still need to supplement the natural light with a lamp or overhead light. I think fluorescent light is fine- you don’t need to buy special photographic lights.

2. Consider the background. People will see not only your Filofax, but what is around it too, so pay attention to the background. I just use the white table for my backdrop, but depending on your style, you could use a roll of gift wrap or a sheet of washi paper. If you have a pretty piece of fabric, you could lay it on the ground near a window and take your pictures there, as long as the pattern isn’t too busy as it will compete with your planner. If you want a white background but don't have a white table, just use a roll of white paper and reflect some light onto it with a table lamp.
One thing you could try is to take your Filofax for a walk─ seriously! Take it with you to your local café, market or park and photograph it in the context of your life. I love seeing Filo photos that give a little insight into how people in other countries live.
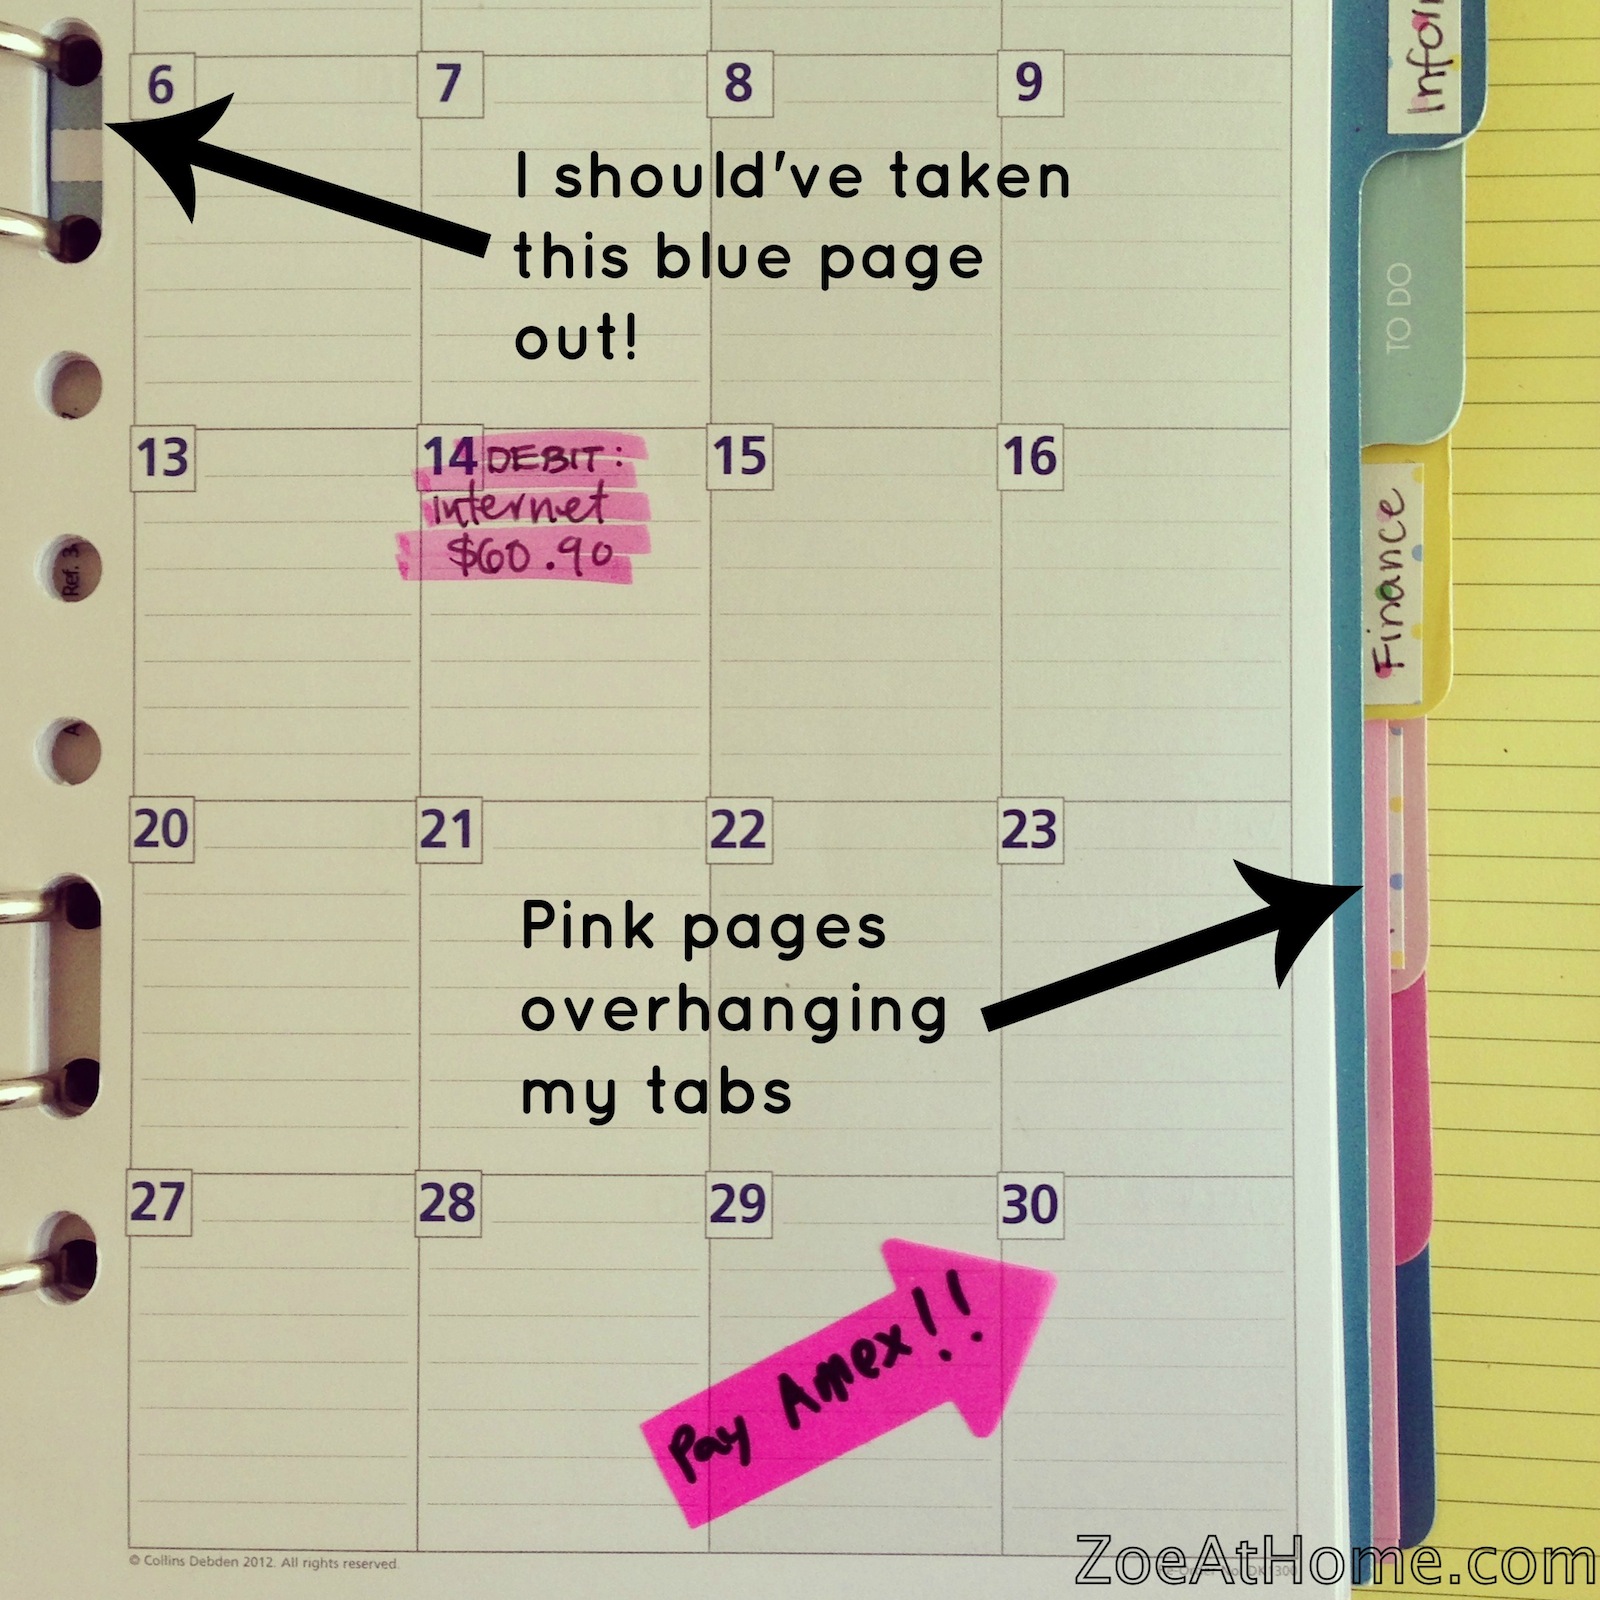
3. Tidy up your pages. You might need to remove some pages, or at least line them up at the edges. In real life, our planners are stuffed to capacity, with lots of memos and sticky notes crammed in, but this makes for busy-looking photos. I often use a blank page if I just want to show how I’ve set up my planner. I think white space makes Filofax pictures ‘read’ better on small screens.
4. Stylise your shots. Try to develop a unique style for your shots that reflects the look and feel of your blog in general. A great way to develop your branding is through your photos. On my blog, I always use a square format and the same filters for all my photos. Also, I try to always be aware of how the feature photo of each post will look on my homepage. You could also add a pretty watermark or colourful border so some cute overlays. Just be consistent, to make your pictures easy to recognise.
5. Optimise your pictures for social media sharing. Philofaxy has a ‘no-Pin’ policy, and I can understand the very good reasons for this, but on you own blog, don’t overlook Pinterest as a great way to attract new visitors. Whenever I check my stats, there are always referrals from people who have pinned my pictures, and this number grows every week. Or consider Facebook sharing: people are more likely to click through if there is a photo showing them the attractively-presented content they will find on your site.
I don’t worry about people ‘stealing’ my photos on Pinterest. To me, it’s not stealing, it’s sharing, and it brings new visitors to my blog. If I’ve taken a great photo that people want to pin, I know I can take more great photos that will be just as popular. I just assume that any photo could be pinned, so I watermark everything before uploading it. This is also important in case the links get broken which can happen when things go viral. I use iWatermark Pro by Plum Amazing, which cost me about $30.
To make your images attractive to Pinterest users, you need to create a collage of some sort, with some great photos and a headline that draws people in. [I will be making mine as unattractive as possible to Pinterest users! - Steve]

I put this picture on the Coming Soon page of my blog, and I couldn’t believe how many times it got pinned and re-pinned before this series was even published. So I spent some time analysing what made it ‘pinnable’:
- The headline: a lot of Pinterest users are interested in personal organisation.
- The colours: the use of pink is very feminine (most pinners are female) and the repetition is pleasing to the eye.
- The Filo shots: there are a lot of Filofax fans on Pinterest.
- The promise of more if you click through: it gives the impression that there will be hints on a range of aspects of personal organisation in the post. The image tells a little story about what my blog is about.
Finally, there’s no need to spend hours editing your photos to perfection. Just get the basics right. A post with a good photo is always better than a post without one, or no post at all. So show, don’t tell the world how Filofax helps you live life to the full!
Thank you Zoe for your guest post, I will admit to admiring your photos on your site before now. It was great to get a different viewpoint on a topic we have previously covered.
Of course if any one would like to revisit a topic with a guest post on Philofaxy then please get in touch philofaxy [at] gmail [dot] com
Great post Zoe - thanks!
ReplyDeleteGreat pointers, Zoe!
ReplyDeleteHad to smile at Steve's remark about Pinterest ... ;-)
Thank you everyone! I'm glad to be on Philofaxy after following the site for a long time. Thanks also to everyone who has visited my blog and left comments! :)
ReplyDeleteGreat suggestions, Zoe - thank you!
ReplyDeleteThank you, for a wonderful post!
ReplyDeleteLove Zoe's photography, when I first saw her blog a few months ago it got me thinking about how to improve my own pictures for the blog
ReplyDeleteSteve
Great tips and lovely crisp photos Zoe. I've been considering upgrading to a decent phone/camera for a while.
ReplyDeleteYou don't need to buy an expensive camera. As long as you have a decent enough amount of megapixels, say 5 or more, you will get sharp photos if you have enough light. It's not all about the camera: Steve said a similar thing in his post on photography a while back. Even iPhoto is great for editing doing basic edits. Complicated photo editing software just, well, complicates things!
DeleteWow...beautiful photos and great tips. Such attention to detail. I don't have a blog but I will be bookmarking this info for future use and even if you don't have a blog there are many useful tips here. Thank you!
ReplyDeleteWow...beautiful photos and great tips. Such attention to detail. I don't have a blog but I will be bookmarking this info for future use and even if you don't have a blog there are many useful tips here. Thank you!
ReplyDeleteThanks for the great tips and welcome to Philofaxy, Zoe! Looking forward to hearing more from you.
ReplyDeleteJust a tip, you can watermark photos with a free phone app called Picsart, as well as create awesome graphics that look like you spent hours in Photoshop! There's a small learning curve but they have a blog full of tutorials and its a really amazing app! I think its only available for android devices currently but I could be wrong. I shoot my pics with my high grade digital camera and transfers them all to my phone (at least for my website and shop photos) to edit before uploading. Hope this saves folks some $
ReplyDelete